Radiator hose leaks at clamps can spell trouble for your vehicle’s engine. As responsible car owners. Mastering the art of fixing coolant hose leaks is essential. So fortunately, this seemingly daunting task can be easily tackled with a few steps. In this guide, we’ll delve into the process of addressing radiator hose leaks at clamps. And ensuring the longevity and efficiency of your vehicle’s cooling system.
Contents
Understanding the Culprits Behind Coolant Hose Leaks
Your car’s cooling system comprises a delicate interplay of components. Including the water pump, radiator, thermostat, Coolant Temperature Sensor (CTS), coolant, and crucially. The hoses that facilitate the flow of coolant. Ensuring a secure connection at these junction points are hose clamps. Let’s unravel the potential causes behind these leaks and explore their origins.
- The Peril of a Loose Clamp:
Often, vehicles are equipped with spring-type clamps, designed to adapt to temperature fluctuations. However, these clamps may gradually lose their grip, leading to leaks over time. Another variant, the worm gear band clamps, can also succumb to loosening. - Aging Hoses and Clamps:
The longevity of your coolant hoses matters. After approximately 15 years of service, it’s prudent to inspect them for wear and tear. Despite their high resistance, silicone hoses can degrade, potentially resulting in hidden leaks. Detecting these leaks might involve a gentle squeeze, revealing soft spots or uneven sponginess.
An additional concern arises from rusted clamps, which lose their firm grip. Reusing spring-type clamps can exacerbate the issue, as their one-time use nature could lead to further leakage.
Resolving Radiator or Coolant Hose Leaks at Clamps: Step-by-Step Guide
Equip yourself with the necessary tools before embarking on this operation: gloves, a screwdriver, a collection bucket for coolant, new hose clamps, and wrenches or pliers. Depending on the leak severity, you might even require a new radiator hose.
Step 1: Thorough Leak Inspection
Begin by identifying the precise location of the leak. Both the upper and downward hoses of the radiator possess clamps – four in total, connecting four crucial junctions. While the repair approach remains consistent, it’s advisable to prioritize the upper section if leaks occur on both sides of a hose.
Upon locating the leak, assess its nature. Is the clamp visibly loose, or does the hose exhibit a tear or crack? A dripping coolant or a disfigured mouth signifies a loose clamp. Give the hose a gentle wiggle to gauge its stability. Alternatively, if you suspect a tear, apply slight pressure to the hose and listen for a telltale whooshing sound.
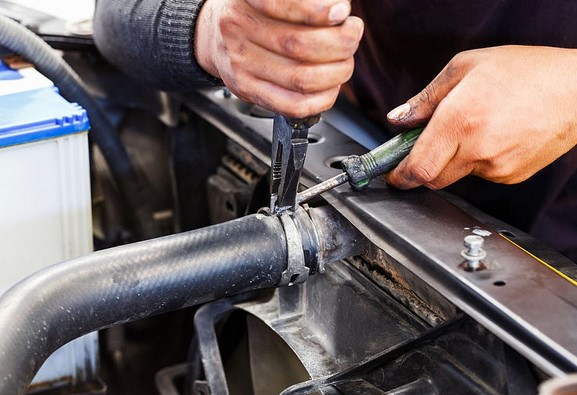
Step 2: Skillful Clamp Tightening
When the hose itself remains intact, tightening the clamp becomes your objective. Spring-type clamps necessitate pliers to firmly secure their locking heads. Conversely, a worm gear band clamp’s bolts should be tightened using a screwdriver.
Post-tightening, observe the leak area for any cessation of coolant drips. Subsequently, start the engine and closely monitor the clamp connection’s integrity.
Revitalizing Your Vehicle: A Comprehensive Approach to Rectifying Radiator Hose Leaks at Clamps
Change and Re-Assemble Hose and Clamp
Step 1: De-Assemble Hose and Clamp
Merely tightening a loose clamp won’t suffice if the hose itself has succumbed to wear. In such cases, disassembling and re-assembling the clamp and hose is the remedy. Keep in mind that clamps, regardless of type, should not be reused.
Using pliers or a screwdriver (or your preferred tool), depending on the clamp type, gently loosen the clamp and allow it to hang. With precision, extract the hose, wiggling it gradually for a smoother removal process. To avoid mess, position a bucket beneath the open end to catch any residual coolant. With this step complete, you’re ready to introduce the new components.
Step 2: Introduce New Parts
Now, equip yourself with a sharp tool for trimming the worn mouth of the hose. If a modest reduction in length suffices, the hose can be reused. But remember to refrain from reusing the clamp. If multiple tears or cracks are detected, opt for a new hose without hesitation.
Begin the installation process by applying WD40 spray to the connector point, ensuring a smoother surface for hose attachment. After securing the hose in place, shift your focus to the new clamp. Ensure its diameter and material align with your hose or consult your vehicle’s user manual for guidance. When connecting clamps on both sides, leave one side slightly undone for ease of wiggling and positioning when attaching the other side. Aim to select a hose with a bent shape resembling the previous one; a warm water rinse has proven beneficial. Voilà! You’re on the cusp of completion. Finish by replenishing with new coolant, starting the engine, and conducting a final assessment for performance and integrity.
Preventing Hose Leaks at Clamp
Material Selection: Opt for marine-grade stainless steel clamps to avert rust-related issues.
Clamp Variety: The choice of clamp type is a topic of debate; however, it’s advised to follow your vehicle manufacturer’s recommendations for optimal cooling system performance.
Heat Shield Implementation: Shield your hose from extreme heat exposure by adding a heat shield, prolonging its lifespan.
Routine Fluid System Maintenance: Periodically flush the entire fluid system beneath the hood, encompassing the engine oil, metallic residue, and coolant pathway.
Frequently Asked Questions
- Can I Use Multiple Clamps?
While you can use a maximum of two clamps at a connector point, it’s advisable to use a single clamp to prevent pressure imbalances and potential damage to the hose. - Is Over-Tightening a Concern?
Over-tightening the clamp can indeed lead to leaks, as excessive tension may cause the hose to protrude and compromise the seal. - Is Temporary Superglue Usage Acceptable?
In urgent situations, such as on a highway, temporary solutions like water-resistant superglue or strong tape can seal visible tears temporarily. However, swift replacement of the hose and clamp remains imperative. - Should I Swiftly Replace a Slightly Leaking Clamp?
Even a minor leak warrants attention, as the flawless operation of the entire cooling system hinges on unobstructed coolant flow. Immediate action is recommended to avoid disruptions.
Conclusion
Preserving the Longevity of Your Vehicle: A Holistic Approach to Mitigating Radiator Hose Leaks at Clamps
Safeguarding the integrity of your four-wheeled companion demands vigilance in coolant leak control. Armed with the knowledge of rectifying radiator and coolant hose leaks at clamps, you’ll come to appreciate that prudent care and timely replacement of hoses and clamps translate into substantial savings. The alternative could entail costly radiator and engine failures. Embrace these guidelines and ensure your automobile journeys remain joyous and trouble-free. Happy and safe travels!
You may also read: